In the previous blog, I demonstrated how to create email templates in Dynamics Customer Service. This blog continues from there, showing you how to simplify the process of sending emails generated from these templates with just a button click.
If you’re new to this topic, I recommend referring to the first part of the blog for a better understanding. Creating Pre-Defined Email Templates In Dynamics 365 Customer Service
Here, we’ll use JavaScript (JS) to call a Power Automate Flow. The JS function triggers upon a button click, passing the GUID of the case record clicked.
(Note: Power Automate Flow can be triggered in various ways, not limited to button clicks. For instance, it can be initiated by changes in toggles.)
Use case demo:
As discussed previously, our email template contains fixed content and dynamic values like customer names and service team members’ names.
In the previous method, users had to manually create emails, insert the template, and send them.
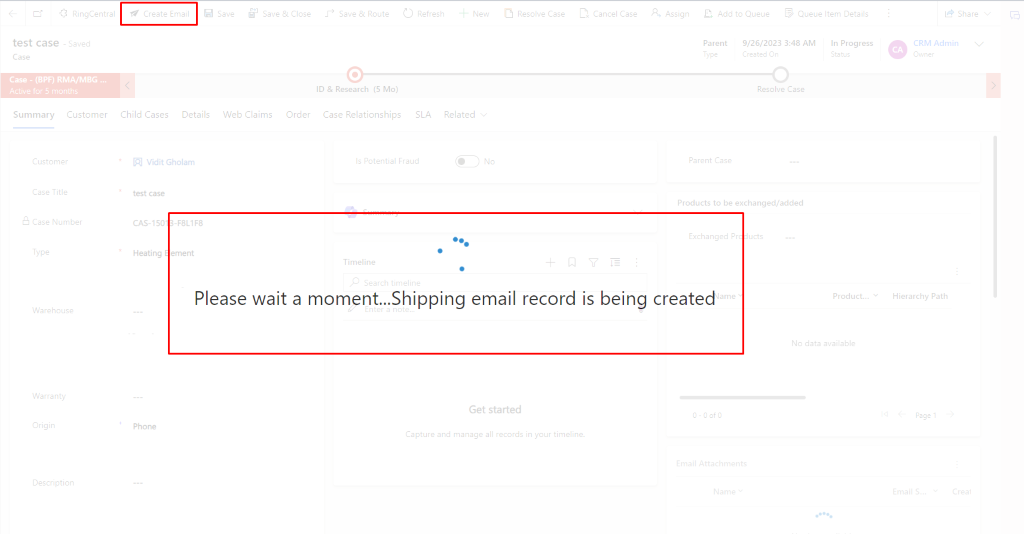
In this blog, we’ll bypass these manual steps. Emails will be generated and sent with a single click. Users simply click the “send email” button on the case form. They’ll then see a progress indicator, and upon sending, receive a notification.

Ribbon Button & JS
Step 1: Add a ribbon button to the case form and insert the following JavaScript (JS) code into the ribbon button. Ensure to customize the notification messages and include your Flow’s HTTP request URL in the JS.
var TriggerFlow =
{
    Main: (executionContext) =>
    {
        debugger;
        var formContext = executionContext;
        //Strict Defined Parameters
        var RecordID = formContext.data.entity.getId().replace("{", "").replace("}", "");
        var EntityName = formContext.data.entity.getEntityName();
        formContext.data.save();
        //Find Plural Logical Name of the Entity and Call Flow
        Xrm.Utility.getEntityMetadata(EntityName, "").then(
            function (result)
            {
                Xrm.Utility.showProgressIndicator("Please wait a moment...Shipping email record is being created")
                TriggerFlow.CallFlow({logicalEntityName: result.EntitySetName, CurrentRecord: RecordID});
            },
            function (error)
            {
                console.log(error);
            }
        );
    },

    CallFlow: ({logicalEntityName, CurrentRecord}) =>
    {
        var flowUrl = "**********HTTP Request Link of your FLow***************";
        var inputdata = JSON.stringify({
                "RecordID": CurrentRecord
        });

        var req = new XMLHttpRequest();
        req.open("POST", flowUrl, true);
        req.setRequestHeader('Content-Type', 'application/json');
        req.send(inputdata);
        req.onreadystatechange = function () {

            if (this.readyState === 4) {

                req.onreadystatechange = null;

                if (this.status === 200) {

                    Xrm.Utility.closeProgressIndicator()
                    Xrm.Page.ui.setFormNotification("Email has been sent to the customer", "WARNING");

                }

                else if (this.status === 400) {

                    var result = this.response;
                    var alertStrings = { confirmButtonLabel: "Yes", text: "Error "+result, title: "Document was not generated" };
                    var alertOptions = { height: 120, width: 260 };

                    Xrm.Navigation.openAlertDialog(alertStrings, alertOptions).then(
                        function success(result) {
                            console.log("Alert dialog closed");
                        },
                        function (error) {
                            console.log(error.message);
                        }
                    );
                    Xrm.Utility.closeProgressIndicator()

                }

            }

        };
    }
}
Step 2: Open the desired email template to be automated and copy its GUID. We’ll utilize this later in the process.

Power Automate Flow Implementation.
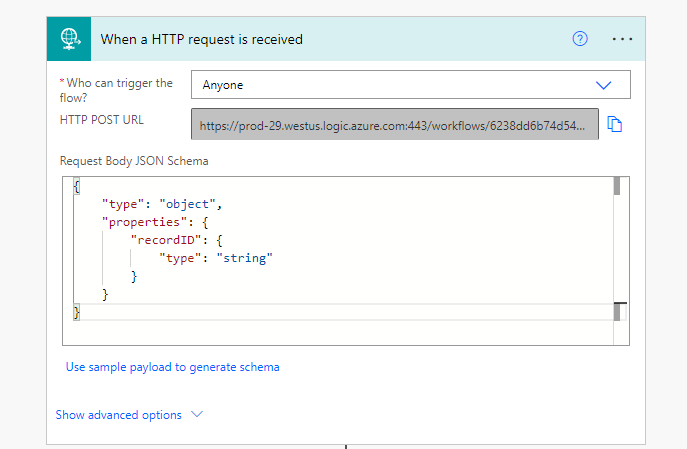
Step 1: Create a Power Automate flow with the trigger “When a HTTP request is received.” Include the following schema in your trigger configuration
Step 2: Within the Power Automate flow, add a “Get a row” action for both the Case entity and the User entity. This action retrieves information about the specific case and user involved in the email generation process. For the User entity, ensure to input the GUID of the support user who will be set as the From-Party of the email. This GUID can be hardcoded in the action.
Step 3: Add another “Get a row” action, this time for the Email Template entity. Use the GUID of the email template copied earlier to retrieve its details.
Step 4: Next, incorporate an “Unbound action” titled “InstantiateTemplate.” Pass the necessary parameters as depicted in the image below.

Step 5: Parse the Body from the unbound action with the below Schema.
{
    "type": "object",
    "properties": {
        "@@odata.context": {
            "type": "string"
        },
        "value": {
            "type": "array",
            "items": {
                "type": "object",
                "properties": {
                    "@@odata.type": {
                        "type": "string"
                    },
                    "subject": {
                        "type": "string"
                    },
                    "description": {
                        "type": "string"
                    }
                },
                "required": [
                    "@@odata.type",
                    "subject",
                    "description"
                ]
            }
        }
    }
}

Step 6: Create an email record, the unbound action which we parsed will give us the Subject & Description (Email Body) that was generated from the template.


Step 7: The final step is to perform a bound action on email message which we created and send success (200) response back to the JS.

Response messages back to JS, you can setup your own error handing in this flow, if anything fails you can set a (400) response to the JS.

Hope this was a helpful read 😊! Please leave your comments and suggestions in the comments below.

One thought on “Generated And Send Emails From Email Templates With a Button Click in Dynamics 365 Customer Engagement ”